Welcome to the world of game development with Godot! This tutorial is designed for absolute beginners and uses the latest information and resources from 2025 and 2026. By the end, you’ll understand what Godot is, how to get started, and where to find the best free and paid resources to learn more.
What is Godot?
Godot is a free and open-source game engine, licensed under the MIT license. This means you can use it for any project—personal, commercial, or educational—without paying royalties or subscription fees. It supports both 2D and 3D game development, and is known for its modular scene and node system, which makes organizing and managing game elements easy.
Godot’s scripting language, GDScript, is simple and Python-like, making it ideal for beginners. Godot 4 (the latest stable version as of 2026) offers improved 3D rendering, physics, and networking features compared to Godot 3.
Why Learn Godot in 2025–2026?
- No hidden costs: Unlike some other engines, Godot is completely free.
- Growing community: With the Unity pricing controversy in 2023–2024, many developers have migrated to Godot, leading to a surge in tutorials, courses, and community support.
- Versatile: Great for both 2D and 3D games, and even XR (extended reality) projects.
- Beginner-friendly: The engine’s design and GDScript make it easy to learn.
Getting Started: Your First Steps
1. Download Godot
Visit the official website godotengine.org
Download the latest version (Godot 4.5.1 as of today). It’s available for Windows, macOS, and Linux.
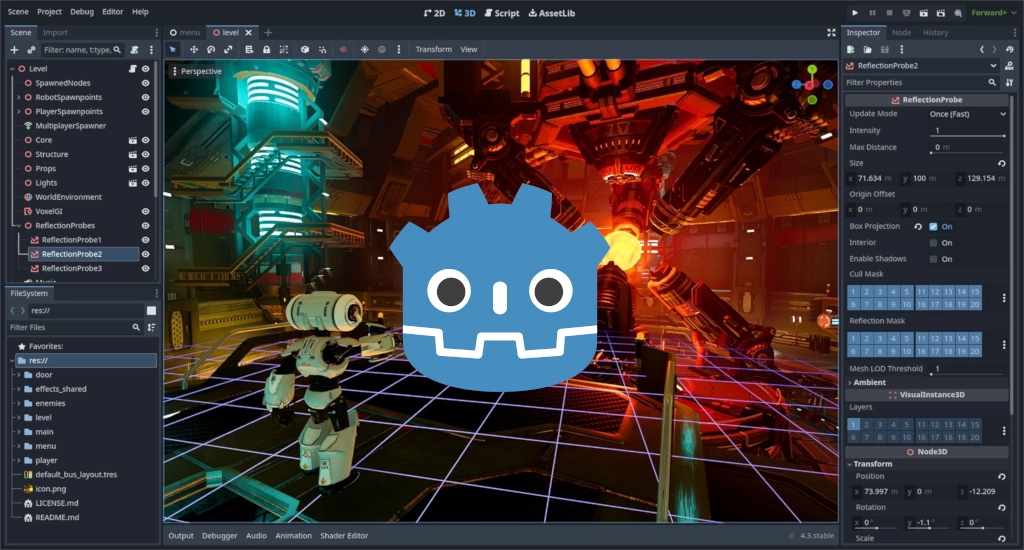
2. Understand the Interface
When you open Godot, you’ll see:
- Scene Tree: Where you organize your game objects (nodes).
- Inspector: Edit properties of selected nodes.
- Viewport: Where you design and preview your game.
- FileSystem: Manage your project’s files.
- Script Editor: Write your game’s code.
3. Learn the Basics: Nodes and Scenes
Godot’s architecture is based on nodes. Everything in Godot is a node: sprites, cameras, lights, UI elements, etc. Nodes are organized into scenes, which are reusable groups of nodes.
- Node: The basic building block.
- Scene: A collection of nodes that work together.
You can create complex games by combining and nesting scenes.
4. Write Your First Script
Godot uses GDScript, which is similar to Python. Here’s a simple example:
# This script moves a node to the right

extends Node2D

func _process(delta):
    position.x += 100 * delta
Attach this script to a node (like a Sprite), and it will move across the screen.
Absolutely! Here’s a step-by-step beginner guide (updated for Godot 4, 2025–2026) that walks you through creating a new project, setting up a basic character with a sprite and collision, and writing a simple movement script.
Your First 2D Character
Step 1: Create a New Project
- Open Godot.
- Click “New Project” in the project manager.
- Choose a folder for your project and give it a name (e.g., “MyFirstGodotGame”).
- Click “Create”.
Step 2: Add a Node2D as the Root
- In the Scene panel (top-left), click the “+” button to add a new node.
- Search for “Node2D” and select it.
- Click “Add”.
- This Node2D will be the root of your scene. You can rename it (e.g., “Player”) by clicking it and pressing F2.
Step 3: Add a Sprite for Your Character
- With the Node2D selected, click the “+” button again.
- Search for “Sprite2D” and add it as a child of the Node2D.
- Select the Sprite2D node.
- In the Inspector (right panel), find the “Texture” property.
- Click the dropdown and choose “Load”.
- Select an image file (e.g., a PNG of your character).
- If you don’t have one, you can use Godot’s built-in “icon.png” for testing.
- Adjust the “Position” if needed so your sprite is centered.
Step 4: Add a CollisionShape2D for Physics
- With the Node2D still selected, click the “+” again.
- Search for “CollisionShape2D” and add it as a child.
- Select the CollisionShape2D node.
- In the Inspector, find the “Shape” property.
- Click the dropdown and choose “New RectangleShape2D” (or any shape that fits your sprite).
- Use the “Edit” button to resize the shape so it fits your character’s sprite.
Tip: You can also use the “Lock” icon in the toolbar to prevent accidental edits to the shape.
Step 5: Write a Script to Move Your Character
- Select the Node2D (your “Player” node).
- In the Inspector, click “Add Script”.
- Choose “GDScript” and click “Create”.
- A new script editor window will open. Replace the default code with the following:
extends Node2D

# Movement speed (pixels per second)
var speed = 200
var velocity = Vector2()

func _physics_process(delta):
    # Reset velocity
    velocity = Vector2()

    # Horizontal movement
    if Input.is_action_pressed("ui_right"):
        velocity.x += speed
    if Input.is_action_pressed("ui_left"):
        velocity.x -= speed

    # Vertical movement (optional)
    if Input.is_action_pressed("ui_down"):
        velocity.y += speed
    if Input.is_action_pressed("ui_up"):
        velocity.y -= speed

    # Apply movement
    position += velocity * delta

    # Optional: Limit movement to screen bounds
    # position.x = clamp(position.x, 0, 1024)  # Adjust to your screen size
    # position.y = clamp(position.y, 0, 600)
Note:
- The above script uses Godot’s Input Map (default keys: arrow keys or WASD).
- For a more advanced movement with physics, use CharacterBody2D instead of Node2D and the
move_and_slide()method (see below).
Optional: Use CharacterBody2D for Physics-Based Movement
If you want real physics (gravity, jumping, etc.), do this instead:
- Replace the Node2D with a CharacterBody2D as the root.
- Add Sprite2D and CollisionShape2D as children (same as before).
- Use this script:
extends CharacterBody2D

var speed = 200
var jump_speed = -400
var gravity = 1000
var velocity = Vector2()

func _physics_process(delta):
    velocity.y += gravity * delta

    if Input.is_action_pressed("ui_right"):
        velocity.x = speed
    elif Input.is_action_pressed("ui_left"):
        velocity.x = -speed
    else:
        velocity.x = move_toward(velocity.x, 0, speed)

    if Input.is_action_just_pressed("ui_up") and is_on_floor():
        velocity.y = jump_speed

    velocity = move_and_slide(velocity)
Best Free Resources
Free Tutorials & Courses
| Resource | Description |
|---|---|
| GDQuest Beginner Learning Path | Step-by-step free tutorials for absolute beginners. |
| Clear Code’s Godot 4 2D Course | 15-hour course covering the basics of 2D game development. |
| Tutemic’s Godot 4 2D Course | 4–5 hours, ideal for those with no prior experience. |
| HeartBeast’s 2D Game Dev Walkthrough | 5–6 hours, project-based. |
Additional Tips
- Practice regularly: The best way to learn is by building small games.
- Use the Godot Asset Library: It’s full of free and paid assets to speed up development.
- Watch YouTube tutorials: Many creators post up-to-date Godot content.
- Read the official docs: Godot Documentation
Happy game developing! 🎮✨
Like my content? Support me with a tip!