
If you’re like me and like servers, learning how they work and what happens behind the scenes, at some point you must have wondered about web hosts. Majority of small websites out there run on those, and for a simple reason: They’re cheaper than a dedicated system, give you many basic tools from the get go and there are a ton of them(remember, competition is always good).
So in this tutorial, I’ll be sharing what I’ve learned in college: How to create the most basic of web hosts, in which each user has FTP access, a Mariadb database, apache(php) for the server and a disk quota(so they don’t abuse your storage).
Requirements
For your basic web host, you’ll need a couple things. I’ll split them between software and hardware.
Hardware:
- 6 cores CPU(preferably)
- 4GB of RAM
- 100GB of disk
- 100Mbps+ upload speed(cable)
Software:
- Linux distro(I’ll be using Debian 12, but any should do)
- Apache2
- PHP(and phpmyadmin)
- MariaDB
- Cockpit(optional)
- certbot
- quota
- vsftpd
To explain: Hardware requirements listed are what I would personally use when making one, but you can run this on less(in class, we used machines with 1 core each, 40GB of storage, 2GB of RAM and a shared 1Gbps connection between 20 students, but it was for learning purposes only).
Software and how it works may also change over time, depending on when you read this. There’s no ideal Linux distribution, but something without interface(or a lightweight one) is recommended. Basic Linux knowledge is also recommended.
Setup
First things first, install Debian 12.
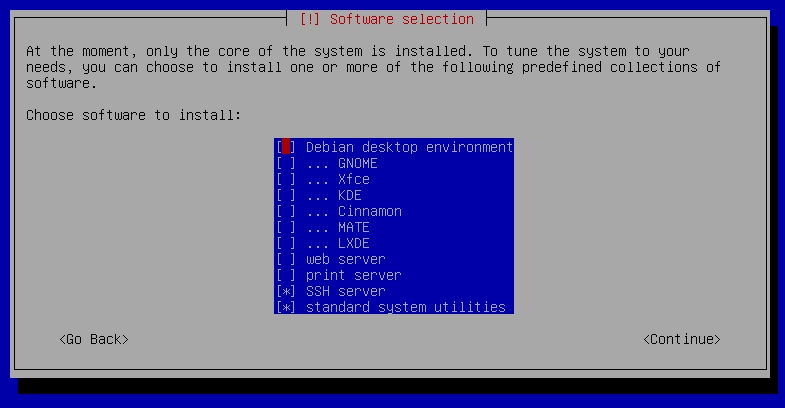
The process is quite straight forward, you’ll configure your keyboard layout, setup an user and password, timezone, set a partition(use the entire disk if you’d like. Its the simplest option), etc. Near the end, you’ll be asked to choose which software to install. Select only “Standard system utilities“.
Keep following instructions until installation is finished.
Your machine will now restart. Once it boots, login as root. From my experience, the network interface shouldn’t be working quite properly just yet, but double check: run a command such as ping google.com and see if it actually reaches google. If it does, skip this next part, if not do the following:
Run the command nano /etc/network/interfacesand modify the text there to be the following:
sources /etc/network/interfaces.d

auto lo
iface lo inet loopback

auto ens18
iface ens18 inet static
	address 192.168.67.205/24 ##USE YOUR LOCAL MACHINE IP HERE
	gateway 192.168.67.1
	dns-nameservers 8.8.8.8 ##googles DNS, but you can use any

auto ens19
iface ens19 inet static
	address 192.168.0.1/24
to find out your machine’s local IP, run ip addr.
With that configured, your machine should now be able to access the internet properly. Now for setting up your package manager for what we need, run nano /etc/apt/sources.listand change its contents to the following:
deb http://deb.debian.org/debian				bookworm		main contrib non-free non-free-firmware
deb http://deb.debian.org/debian				bookworm-updates	main contrib non-free non-free-firmware
deb http://deb.debian.org/debian				bookworm-backports	main contrib non-free non-free-firmware
deb http://security.debian.org/debian-security			bookworm-security	main contrib non-free non-free-firmware
This will ensure you can download and update all packages needed for this tutorial. Now run apt update then apt full-upgradeand if you’d like, restart your machine with reboot.
To end this part, lets install cockpit: a software that should allow us to login to our server through a webpage. This is handy, as it allows to more easily copy/paste commands and monitor services, cpu usage and such. Run apt install cockpit, then once installed nano /etc/cockpit/disallowed-usersand comment or delete the part where it says “root”.
After that, you should be able to access your machine through “YourLocalMachineIP:9090” on the browser.
Installing and configuring
Your server should be accessible after the setup above, but without a certificate. This means browsers will complain. So next, we will install and configure a certificate using certbot. In your terminal, install it using apt install certbot python3-certbot-dns-rfc2136 then verify using certbot certonly --manual --preferred-challenge dns.
You’ll be prompted for an e-mail(any will do), and then for what domains this certificate covers. For the purposes of this tutorial, lets make it cover everything within your domain(you can get a free subdomain for testing using something like cloudns). To do this, type *.yourdomain.com yourdomain.com. Now go to your DNS, add a new TXT record, then insert the values asked. You’ll need to wait a couple minutes to ensure the changes propagate, then press enter to continue.
Now, FTP and Apache. We’ll use a package called VSFTPD to allow our users to each upload files to their own websites and Apache for the web server. To install them, run apt install apache2 vsftpd. Now to configure vsftpd to use our certificate from before, do nano /etc/vsftpd.confthen find the rsa_cert_file line and ensure it and the following lines look like this:
rsa_cert_file=/etc/letsencrypt/live/YOURDOMAIN.COM/fullchain.pem
rsa_private_key_file=/etc/letsencrypt/live/YOURDOMAIN.COM/privkey.pem
ssl_enable=YES
chroot_local_user=YES
allow_writeable_chroot=YES
write_enable=YES
local_umask=027
Restart vsftpd with systemctl restart vsftpd then run the following 3 commands:
mkdir -p /etc/skel/public_html Creates a folder called public_html.
echo /bin/false >> /etc/shellsPrevent users from accessing other user’s home directories.
a2enmod userdirEnables userdir, allowing each user to create a website under their own home directory.
Now restart apache with systemctl restart apache2.
Whenever you want to create a new user, run the commandsuseradd -m -s /bin/false -g www-data USERNAME and passwd USERNAME.
WIth certificates out of the way, time to setup a quota. This is so no one user can simply make use of all your storage. Install quota by running apt install quota then edit the fstab file with nano /etc/fstab. Your file should be like this:
# /etc/fstab: static file system information.
#
# Use 'blkid' to print the universally unique identifier for a
# device; this may be used with UUID= as a more robust way to name devices
# that works even if disks are added and removed. See fstab(5).
#
# systemd generates mount units based on this file, see systemd.mount(5).
# Please run 'systemctl daemon-reload' after making changes here.
#
# <file system> <mount point>   <type>  <options>       <dump>  <pass>
# / was on /dev/sda1 during installation
UUID=2c0ae0c5-ecbe-43bd-8bcf-35273f4540f5 /               ext4    errors=remount-ro,usrquota,grpquota 0       1
# swap was on /dev/sda5 during installation
UUID=fe6ae920-2cf8-4304-ae7f-82c28b696974 none            swap    sw              0       0
/dev/sr0        /media/cdrom0   udf,iso9660 user,noauto     0       0
Ensure to add errors=remount-ro,usrquota,grpquota to the line where it says ext4. Be very careful with this file, as it can break your whole system!
Save and close it. Then run setquota -u USER 1048M 1100M 0 0 /replacing “USER” with a user in your system, 1048M with how much storage you want them to have and 1100M as a hard limit for storage. Finally, start the quota service by running systemctl start quotaon.service. You’ll be able to check quota information with systemctl status quotaon.service.
Reminder: Each client/user of your web host is basically going to be an user in your Linux system. This means that every time someone new registers, you’ll probably need a script to create said user, set a quota for it, etc.
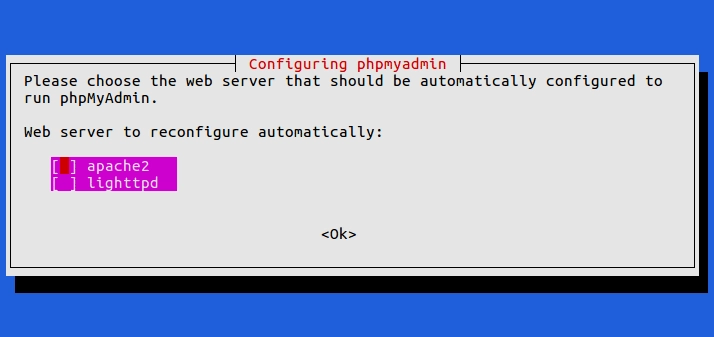
To tie it all up, we’ll install php, mariadb and phpmyadmin: apt install php mariadb-server phpmyadmin. phpmyadmin will prompt you for which web server you’re using, select apache2 then press ok.
Then set it to use dbconfig-common, and provide a password.
Once all is installed, configure apache to use the certificate created earlier by running apt install python-certbot-apachefollowed by certbot --apache install -d YOURDOMAIN.COM
And to ensure each user has their own database, run the following for each new registered user, replacing username, password and dbname with the respective values they desire:
mysql -u root -e "CREATE USER username@localhost IDENTIFIED BY 'password';"
mysql -u root -e "CREATE DATABASE dbname;"
mysql -u root -e "GRANT ALL PRIVILEGES ON dbname.* TO username@localhost WITH GRANT OPTION;"
mysql -u root -e "FLUSH PRIVILEGES;"
Now we configure the Virtual Host, creating a .conf file nano /etc/apache2/sites-available/001-www.confwith the following content:
<VirtualHost *:80>
ServerName www.YOURDOMAIN.com
Redirect permanent / https://www.YOURDOMAIN.com/
</VirtualHost>

<VirtualHost *:443>
	ServerName www.YOURDOMAIN.com
	ServerAdmin webmaster@localhost
	DocumentRoot /home/USER/public_html
	SSLCertificateFile /etc/letsencrypt/live/YOURDOMAIN.com/fullchain.pem
	SSLCertificateKeyFile /etc/letsencrypt/live/YOURDOMAIN.com/privkey.pem
	Include /etc/letsencrypt/options-ssl-apache.conf
</VirtualHost>
and editing the php conf file nano /etc/apache2/mods-available/phpVERSION-YOU-USE.conf(in my case it installed php 8.3, so it’d end in php8.3.conf) to comment the following lines(should be near the very end):
# To re-enable PHP in user directories comment the following lines
# (from <IfModule ...> to </IfModule>.) Do NOT set it to On as it
# prevents .htaccess files from disabling it.
#<IfModule mod_userdir.c>
#    <Directory /home/*/public_html>
#        php_admin_flag engine Off
#    </Directory>
#</IfModule>
finally, enable said configs by running a2ensite 001-www.conf. This will be required for each website.
Conclusion and Final notes
Congratz! You now have a very very basic web host! Every new client will require a set of commands to run, as specified in the article, to ensure everything is configured, but we got all the basics covered. Each user has their own folders, databases and permission to see only what they own.
To further improve things, I’d recommend installing “google authenticator libpam” for two step authentication on cockpit and protecting the mariadb server with libapache2 authnz-external pwauth, but I’m only here to cover the very basics.
Like my content? Support me with a tip!