Windows 10 is approaching its end of life, and Windows 11 keeps going from bad to worse as Microsoft keeps using the system as a spy tool to monetize their user’s data.
If you wish to keep yourself safe, and have some privacy back, while also avoiding A.I. tools nobody ever asked or wants, there’s only one solution: Linux. Fortunately, distributions have been a lot better nowadays, being able to run over 90% of all steam games, support every hardware you throw at it, etc.
With this in mind, here is a simple tutorial to help you migrate from Windows to one of Linux’ most popular distributions: Bazzite!
1. Prerequisites
- Hardware Requirements
Bazzite supports most x86_64 PCs from the past decade and many gaming handhelds (Wikipedia). Make sure your CPU and GPU meet the distro’s minimum specs. - Backup Device
An external drive or large USB stick to store your Windows data. - USB Flash Drive (≥8 GB)
To create a Bazzite installer. - Internet Connection
For downloading the ISO and post-install updates.
2. Back Up Your Windows Data
- User Files
Copy your Documents, Pictures, Videos, and Desktop folders to an external drive or cloud storage. - Browser Data & Settings
- Export bookmarks and passwords.
- Sync your profile (Chrome, Firefox, Edge).
- Application Settings
- Export configuration files from applications you’ll want to replicate (e.g.,
.sshkeys, IDE settings).
- Export configuration files from applications you’ll want to replicate (e.g.,
- Software Licenses & Keys
Note serial numbers or use tools like ProduKey to extract them before wiping Windows.
3. Download & Verify the Bazzite ISO
- Visit the official site and grab the latest desktop ISO:
https://bazzite.gg/. - It will ask you for your hardware(PC, Laptop, handheld, etc). Choose one.
- If you choose PC or Laptop, it will ask you for your GPU(AMD or NVidia) and what desktop environment you want(basically what visual. Pick whatever option)
- (Optional but recommended) Verify the checksum against the SHA256 hash published on the download page to ensure file integrity.
4. Create a Bootable USB on Windows
- Download Rufus (or BalenaEtcher):
https://rufus.ie/ (Bazzite Docs). - Insert your USB stick and launch Rufus:
- Device: Select your USB drive.
- Boot selection: Choose the downloaded Bazzite ISO.
- Partition scheme: GPT (for UEFI) or MBR (for legacy BIOS).
- Click Start and wait for it to finish.
5. Boot from the USB & Prepare Installation
- Enter BIOS/UEFI
- Reboot and press F2, Del, or your motherboard’s key.
- Disable Fast Boot (optional) for better USB detection.
- Secure Boot (if enabled)
Bazzite supports Secure Boot but you must enroll its signing key first. See “Secure Boot Instructions” in the install docs (Bazzite Docs). - Boot Order
Set your USB drive as the first boot device and reboot.
6. Install Bazzite
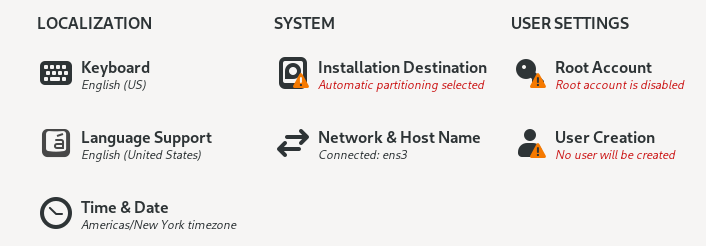
- When the Bazzite live environment launches, start the Installer.
- Select Installation Destination
- Choose the internal drive where Windows currently resides.
- Click Custom to delete existing Windows partitions.
- Partitioning Scheme
Bazzite uses an immutable, BTRFS-based layout by default. You can accept the automatic scheme, or manually create: Mount Point Format Size /boot/efi EFI (FAT32) 300 MB /boot ext4 1 GB / (BTRFS) btrfs rest of drive For advanced users, you can create multiple BTRFS subvolumes (@,@home,@var) (Bazzite Docs). - Proceed
- Set your username and password.
- Review and Begin Installation.
- Wait for it to complete, then reboot—removing the USB stick.
7. First Boot & Post-Install Setup
- Initial Login
Log in with the user you created. - Update System
rpm-ostree upgradeReboot if a kernel update was applied. - GNOME / KDE Setup
- Choose your desktop environment (GNOME, KDE Plasma, or Steam Gaming Mode).
- Customize themes, keyboard layouts, and display settings.
- Enable Flatpak & Add Repositories
flatpak remote-add --if-not-exists flathub https://flathub.org/repo/flathub.flatpakrepo - Install Favorite Apps
- GUI software center or terminal:
flatpak install flathub com.visualstudio.code - Use
ujustorHomebrewfor extra packages if needed (Wikipedia).
- GUI software center or terminal:
8. Restore Your Data and Settings
- Copy Back Files
Restore your Documents, Pictures, etc., from the backup drive. - Browser Sync
Log into your sync account to retrieve bookmarks and passwords. - Re-install Specialized Tools
- Restore SSH keys into
~/.ssh/. - Recreate any custom dotfiles (e.g.,
~/.bashrc,~/.config/).
- Restore SSH keys into
- Gaming Setup
Bazzite ships with Steam, Lutris, and Heroic pre-installed (Wikipedia). Log into each to download your games.
9. (Optional) Remove Windows Dual-Boot Entries
If you initially dual-booted and now wish to erase Windows completely:
- Delete Windows Partitions
Use KDE’s Partition Manager or Gnome Disks to remove the Windows partitions. - Grow BTRFS
Reclaim the freed space by resizing your main BTRFS volume. - Regenerate GRUB
ujust regenerate-grub
Congratulations! You’re now running Bazzite Linux as your primary OS. Enjoy a responsive, gaming-focused Linux environment with atomic updates, rollback support, and seamless Steam integration.
Like my content? Support me with a tip!