Pi-hole is a network-wide ad blocker that acts as a DNS sinkhole. Instead of installing ad-blocking extensions on every single browser and device (phones, tablets, smart TVs), you install Pi-hole on one device on your network and it blocks ads on all of the others.
When a device on your WiFi tries to load an ad (e.g., ads.google.com), Pi-hole intercepts the request and sends it to a “black hole” (nowhere). The result is that ads never reach your devices, saving bandwidth and speeding up your browsing.
Prerequisites
- Hardware: A Raspberry Pi is the standard choice (Zero, 3, 4, or 5 all work well). You can also use an always-on PC or a Docker container.
- Operating System: Raspberry Pi OS (formerly Raspbian) or a supported Linux distribution (Ubuntu, Debian).
- Network: Access to your router’s admin panel (to change DNS settings).
- Basic Linux Knowledge is recommended.
Step-by-Step Installation Guide
Step 1: Prepare your Device
If you are using a Raspberry Pi, flash Raspberry Pi OS Lite (no desktop interface needed) onto your SD card using the Raspberry Pi Imager.
- Tip: In the Imager settings (gear icon), enable SSH and set a username/password so you can control it remotely.
Step 2: Connect and Update
Connect your Raspberry Pi to your router via Ethernet (preferred for stability) or WiFi. Open your terminal (Command Prompt on Windows or Terminal on Linux) and SSH into your Pi:
ssh your_username@raspberrypi.localOnce logged in, update your system to ensure everything is fresh:
sudo apt update && sudo apt upgrade -yStep 3: Run the Installer
Pi-hole has an automated installer that handles most of the work. Run this command:
curl -sSL https://install.pi-hole.net | bashStep 4: Configure the Installation
A blue screen (ncurses interface) will appear. Use Enter to select and Spacebar to toggle options.
- Static IP: The installer will ask to turn your current IP into a static IP. Select Yes. This ensures your Pi-hole doesn’t “move” to a different address on your network.
- Upstream DNS: Choose a provider like Google or Cloudflare (this is who Pi-hole asks when the website isn’t an ad).
- Blocklists: Keep the default list selected.
- Web Interface: Select On. You want this to view your dashboard.
- Logging: Select On if you want to see statistics on what is being blocked.
Crucial Step: At the very end, the installer will show you a password for the web interface. Write this down.
Post-Installation Setup
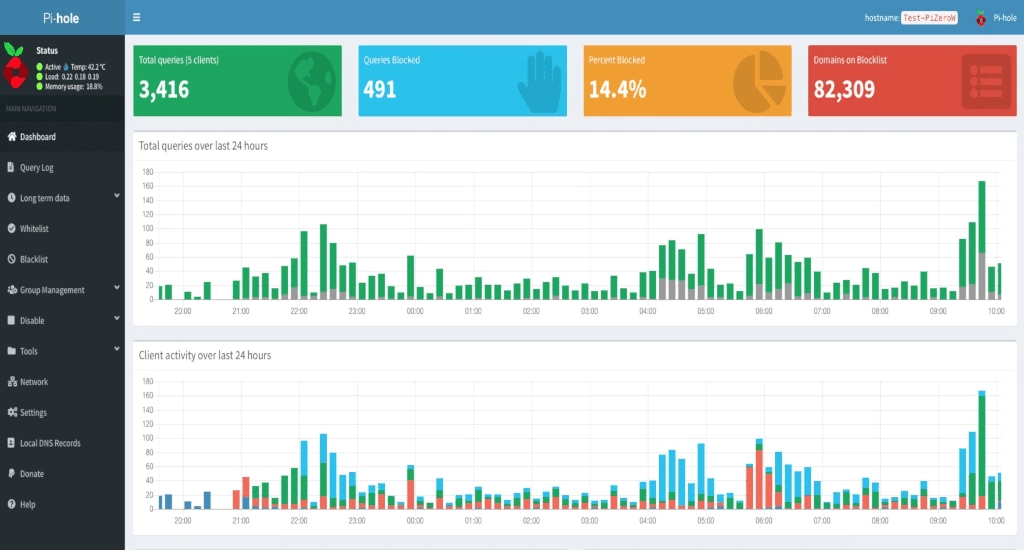
1. Access the Dashboard
Open a web browser on your computer and type:
http://<IP_ADDRESS_OF_PI>/admin
(Replace <IP_ADDRESS_OF_PI> with the IP address shown during installation).
- Login with the password you wrote down.
2. Point Your Devices to Pi-hole
For Pi-hole to work, your devices need to know it exists. You have two options:
- Option A: Router Method (Recommended)
- Log into your router’s admin page (usually
192.168.1.1or192.168.0.1). - Find the DHCP or LAN settings.
- Look for DNS Server.
- Set the Primary DNS to your Pi-hole’s IP address.
- Save and reboot your router. Now every device on your WiFi is automatically protected.
- Log into your router’s admin page (usually
- Option B Individual Device Method: If you can’t access your router settings, go to the WiFi settings on your specific phone or laptop, find “DNS Configuration,” and manually type in your Pi-hole’s IP address.
Maintenance Tips
- Change Password: If you forgot the random password, reset it by running this command in the terminal:
pihole -a -p - Update Blocklists: Pi-hole updates lists automatically on Sunday nights, but you can force it in the dashboard under Tools > Update Gravity.
You can learn more on the official website!
Like my content? Support me with a tip!